Thursday, October 27, 2016

Iridium GO! *Update*

In my initial review of the Iridium GO! Satellite Wifi Hotspot, I was less than thrilled.  While voice calling and SMS messaging worked pretty well, I had been unable to send or receive email or browse websites - email being the primary reason I purchased the device.

I'm happy to report that Iridium did make good on their promise to roll out an update addressing these issues.  Today I was able to successfully download all the back-logged mail sitting on their servers to my phone through the GO!.

If you have a GO!, I recommend you uninstall the Iridium GO! App AND the Mail & Web app, then download and install the latest versions.  After I did that, I was in business.

You still have to pay attention to your signal.  Often times I'll find it ebbs and flows - sometimes down to nothing.  This results in the unhelpful "failed to connect to network" error.  Unfortunately there isn't a signal meter in the Mail & Web app, so you might not realize lack of signal is the reason for the error.  This is something I hope they add at some point.  As it is you either have to look at the device itself (and remove the cover) or flip back to the GO! app.

Unlike previous attempts, when I have a full signal now I've gotten a reliable connection each time.  Worlds better than I was getting a month ago while on my Colorado trip.  I will be more confident taking it along on extended trips when I have to keep an eye on work.

So if you need email (and limited web-browsing), I think the Iridium GO! is worth a look.  It's still not cheap to buy or operate.  But it's also the only game in town for a light-weight and packable satellite internet device.  If you are a small business owner like me it can enable you to steal some time away in the woods.


Thursday, September 22, 2016

Iridium GO! Satellite Wifi Hotspot Review - "Failed to connect to Network"


My Iridium GO! was purchased from www.satphonestore.com.  They had the best price for the device I could find at the time (though now you can get it cheaper via Amazon, with Prime Shipping), as well as much more clear cut pricing models.  They also offered prepaid SIM cards, which no other vendors I researched did.  Below are my experiences with it so far.  I ran into some issues so this is a combination of tutorial and review.  Skip down to Should You Buy an Iridium GO!? if you just want the nitty gritty.


The primary purpose I purchased the GO! for was so work emails could find me in the wild while backpacking.  As a sole proprietor of a small business, being totally off-grid is no longer an option (sadly).


All my testing was done with a Samsung Galaxy S6, with Android 6.0.1, on clear (uncloudy) days with good signal (4 bars or more).


Making your GO! talk to the World


Getting the Iridium GO! up and running is about as clear as mud.  Worse, half the instructions for doing so are wrong.  I had to contact customer service first to get my SIM activated and then again to troubleshoot when I couldn't establish a data connection.  I received much contradictory advice.  Hopefully the walk through below will save you similar aggravation.

Before you begin, locate the IMEI and Serial numbers for your GO!  There should be a sticker floating in the paperwork that comes with your device, or it should be on your invoice.  It should also be under the battery on the device itself.

You'll need to download two apps from your device's appstore, Iridium GO! and Iridium GO! Web & Mail - the latter requires registration before you can use it. (see Register with Iridium further on).

Next, you'll need the device's phone number, and to activate your SIM.  Depending on your provider (and also whether you have a pre-paid or monthly subscription), your device may already be setup and ready to go.  If so, you'll see your number on your invoice or other paperwork, starting with 8816.

I'm using a prepaid plan - to activate the device and SIM (if purchased from SatPhoneStore.com) you need to go here:  http://satphonestore.com/cta.  Normally it takes just a day or two, but there was an abnormal backlog resulting in my activation taking a week (and requiring the first chat with CS).  So I wouldn't recommend waiting until the last minute before a trip (for this and other reasons I'll talk about further on), and contact support if you don't hear anything for a couple of days.

Note - when you buy a prepaid SIM for say, 400 minutes (which I did), that is the number of 'data minutes'.  You need to cut that in half for Voice or SMS messaging.  Put another way, data minute use is at half the rate of voice.  This might not be clear when you buy your SIM - I had to figure this out after the fact.  You can dial 2888 (free call) from the GO! app to get your remaining minutes and their expiration.


Register with GEOS
You'll also need to register your device with GEOS (at least if you want to enable emergency worldwide response, and stop the annoying popup every time you open the app) at https://www.geosalliance.net/geosalert/monitor_iridiumGO.aspx

The registration site is a bit goofy.  Once you fill out all the information (which includes your emergency contacts) and hit "Register", nothing might happen for up to 5 minutes.  If you don't get a popup indicating success, hit the right arrows ">>" in the upper right of the application.  Then hit back "<<".  Then "Overwrite" at the bottom.  Eventually it should work, depending on how busy the site is.  My guess, they don't have a lot of server overhead.  If you get a popup and/or an email, you've done it!

Now, you'll need an activation code (which the Iridium GO! app will prompt you for every time you open it) to connect to GEOS and enable the SOS functions.  To get it, refresh the page and hit "Login to existing registration".  If you get all the fields right and hit "Login", a 5 digit code should appear in the bottom left.  If you got the 'success' popup, the code should be in there as well.


Register with Iridium
Finally, you'll need to register at one more site to gain the use of the Iridium GO! Web and Mail app, here: https://www.iridium.com/iridiummailampwebregistration - a confirmation email should be sent to you with the username and password you chose.


Get your apps configured

Charge and turn on the Iridium GO! by lifting the antenna.  No need to start an "Internet Call" or do anything else directly on the GO! - everything happens in the apps.  So just make sure you have a good signal for now.

I received some inconsistent advice on Airplane Mode. A CSR directed me to turn Airplane mode on (then to turn Wifi back on), but my tests seemed unaffected by it being on or off.  If you have trouble at any stage, give it a try.

Connect to the GO!'s Wifi network.  It will be 'Iridium-XXXX' with a blank password.

Start the Iridium GO! app.  You will be prompted to enter the GEOS activation code.  Enter the 5 digit pin obtained earlier.

Next, you should be prompted to enter a username and password.  The default is 'guest' and 'guest'.  Don't change these, even though the web directions say it's safe to do so later.  You will have to login this way each time you want to connect to the GO!.

Once connected, you will see the Signal Strength and battery life.  If you don't, you aren't really connected.  Hit the login button at the bottom and retry.  If you run into issues or things seem stuck, kill the app and try again.  Sometimes waiting a few minutes also does the trick.

If you want to create a new user for a little bit of added security, click 'Advanced', then hit 'User management'  Make a new account, give it all permissions including admin rights.  For simplicity, it might help to make your username/password the same as your Iridium account, though it shouldn't be strictly necessary to make everything work.

Hit your back button and save.  Hit back one more time and hit save again.  Now, if you want you can go back into 'User management' and remove the admin rights from the 'guest' account - but don't change anything else.  Hit back and save.

Also under 'Advanced', you can change the Wifi settings if you choose.  Again, I received some conflicting info from a CSR at Satphonestore.com - but I changed both my SSID and password and got a connection.  And once you change the password, you can't go back to having a 'blank' one without factory resetting the Iridium GO!.  It might be wise to leave the defaults until you make sure everything else works.

There are some customization options under 'Settings', but you can leave them all alone for now.

So assuming you have a decent signal, and you managed to log on to the GO! from the GO! app on your smartphone, your phone should now be operating as a Satellite phone.  Hit 'Call' and dial *2888 - this is a free call that will tell you your remaining airtime minutes.  Just as importantly, it will tell you if your setup and hardware is working.

Note - this will tell you the number of 'voice' minutes you have, half of the total 'data' minutes on your plan.


Reach out to the World
To make a call, you need to dial 00 + Country Code + Phone Number (all 10 digits for the US).

To call another Iridium Satellite phone, just dial 00 + 12 digit Iridium number (which should start with 8816).

To send a text (SMS), click on 'Messages', and hit the compose button in the upper right. Use the full number plus country code of your recipient.  So for the US that's  1 + 10 digit phone number.

To check your voicemail, dail 00-8816-6299-0000 from your GO!, or 011-8816-6299-0000 from a landline or mobile.  When prompted, enter our Iridium number.  Wait for the greeting then hit *.  You will then be prompted for your password, which is the last 7 digits of your phone number.

*Note - voicemail and text messages are supposedly only saved on the Iridium network for 24 hours


Getting the World to Reach You
To have someone call you, they must dial 011 + Your 12 digit Iridium number (8816-XXXX-XXXX).  Note - this is an international call and will be billed as such by their service provider (unless you got a US number for your Iridium.  I didn't know this was an option when I ordered mine).

Alternatively, you can have callers call you and use your satellite airtime by dialing 1-480-768-2500 then entering your 12 digit number when prompted.

You can receive SMS messages in one of two ways:

Go here: http://www.satphonestore.com/freesms where you can send a free message (free for the sender, you will be charged to receive the text).  Reply's will go to the email address provided on the web form.  Oddly, you can't input a phone number.

Or, just send an email to [12 digit Iridium number]@msg.iridium.com.  The email will be truncated to 140 characters - most of which will get gobbled up by the email header code, so it will be of limited utility.


Get Online
Getting online is probably a bit of an overstatement.  It's more like brief connections where furious bursts of tightly compressed data get squirted into space.  You are never going to be freely browsing the 'net.  And at the cost of airtime, you really don't want to be.

Up until now, while obtuse at times, my Iridium GO! setup had progressed flawlessly.  When it came to a data, it took several days of going in circles with a CSR to establish my first connection.  If you followed all the directions I outline above, hopefully you'll have less trouble then I did.

To get a data connection, you need to use the Iridium Mail & Web App you downloaded earlier (the fact that 'Mail' comes before 'Web' should be a hint as to the apps priorities!).  Also, during the install, you should have been prompted to install XWeb as well (a Firefox based internet browser designed for low bandwidth internet usage).

In the Iridium Mail & Web app, go to 'Settings'.

Hit the first option to enter your Iridium account username and password, along with your name.  Leave everything else alone and hit 'Save'.

Go back to 'Settings', and hit connection.  Under Select Route, choose "Iridium GO! for mobile devices".  Enter IP address 192.168.0.1, and port 80.  Leave the password as "device default password".  (You can also just hit auto-detect which takes a few seconds but fills in everything for you).  Hit Save.

Configure your Facebook account if you want under 'Social Media'.  Check the settings under 'Weather' and change them if you like.

Leave everything else alone, including 'Diagnostics' OFF.

Mail server - under this option in theory you might be able to enable direct access to your own mail server.  I haven't tried and I bet it's a pain in the ass to get working, since I can't reliably get access to Iridium's standard email server.

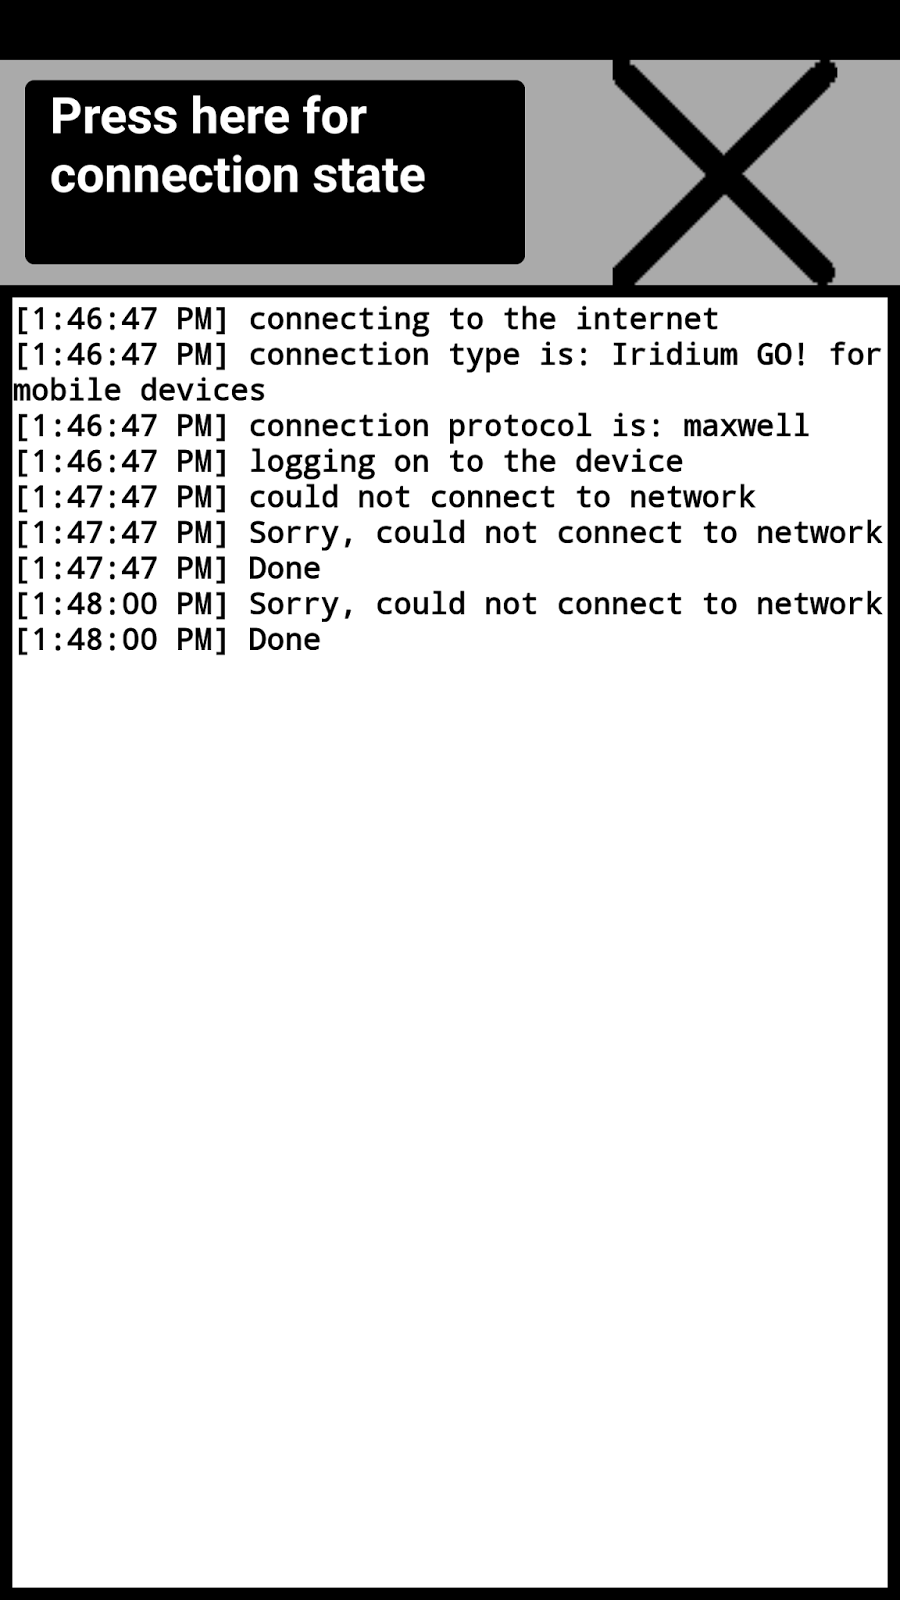
Now, pray to the Satellite Gods, that they might bestow upon you a data connection, and press 'Connection'.  Hit 'Press here for connection state', which will turn into a 'disconnected' notice with a big red dot.  Hit the same button again.

If you are lucky, or good, or both - the big red circle in the upper right will turn green after a minute.  Huzzah!  Hit the top button again to turn the connection back off and avoid burning through your minutes.

If not, try again.  Check your signal (signal strength can drop in and out seemingly at random).  Make sure you have open sky above (I know, duh).  Try turning on Airplane mode, so that only your smartphones Wifi is active.  Try spinning in circles, standing on one foot, or praying more.

If none of that works, you can send Satphonestore.com a trouble ticket here: https://www.satphonestore.com/helpdesk/customer/index/ - or message whoever your provider is.

I was never able to contact anyone for tech support at Iridium directly.  While they have a contact form (which is hard to find) - I never received any replies.  So I wouldn't bother.  Going through your vendor seems to be the only way.

Assuming you achieved a connection, you can backup, and hit 'Mail' or 'Web'.  Mail will take you to a simple interface where you can compose messages and see any previously downloaded messages.  Hit "Send/Receive" to activate your Iridium GO!'s internet connection.  The app will check for new messages, and sent any in your outbox - then immediately terminate the connection again.

So far, I haven't been able to load a single website.  Keep in mind, loading even a mobile friendly site is going to be slow and painful.  But all my attempts have timed out.  I have read reviews where other reviewers have been able to load mobile sites.  But so far for me, no luck at all.

I have, to date, only been able to download 2 partial emails - despite the Mail & Web app detecting over 2 dozen sitting on the Iridium server during my testing and supposedly going through the download process.  Usually the app hangs.  But even if it completes, the emails are no where to be found.  Still waiting on some sort of resolution to this.  I filled out a 'troubleshooting form' sent to me by SatPhonestore.com, which they are forwarding to Iridium.

To summarize, all the functionality of the 'Mail & Web' app for me has so far been useless - though the connection appears to be active and working.


So what did work?

I was able to receive and send standard SMS messages with the Iridium GO! app as well as place calls, fairly reliably.  So in the end, to get my work emails, I forward incoming messages to [my iridium phone number]@msg.iridium.com.  Again, this only gets you the first 140 characters (all remaining are lost to the void, they don't come through in subsequent messages).  But it was enough to know if I needed to do something usually.

If your email provider requires a verification email to be forwarded (like Gmail does), you are S.O.L. for this work around - the verification email will be truncated, cutting off part of the code you need.  But if you have Google Apps for work, there is another way to do it - you'll have to contact the admin for your domain.

What I ultimately did for replies, was to have someone send me the full text to my Delorme Inreach.  Messages to the Inreach are also broken down to 140 at a time, and has to be done via the Inreach Mapshare portal.  But this worked reliably at least.  I could then compose a reply directly to my client, or just had my message relayed.

Not really ideal to have to use 2 separate devices to accomplish my goal - and I was left wondering why I was even carrying the Iridium GO!.


Other features of the Iridium GO!


The one benefit of the limited use I put the GO! through, was that the battery lasted my entire 10 day trip without needing a recharge.  Maybe 10 total hours of  connected ('up') time, which gave me almost half the battery capacity to spare.  That seems pretty reasonable to me, and something you can easily manage with a solar charger on a longer trip.  The GO! has a standard Micro-USB port under a water-resistant cover.  The battery is also removable and replaceable, a good feature for such an expensive device.  You can just pop in a new battery when needed - or replace them when they've reach the end of their useful life without having to return the GO! for a factory batter replacement.

Under another water-resistant cover is the SOS panic button, so that search and rescue can come pull you out of whatever fine mess you've gotten into.  The covers are stiff however.  If you don't have good fingernails, you might need a knife or improvised tool to get them open.

On the back of the GO! is a standard 1/4 camera thread mount (also the same as speaker mounts for home theater systems) so you have good options for mounting the device in a permanent fashion.  A screen cover is included and should be used to keep direct sunlight off.  The GO!'s housing is weather resistant and should keep it safe in most conditions, though I would avoid too much exposure if you have a charging cable connected unless you make an effort to make the connection water-tight.


Should You Buy an Iridium GO!?


Alright, now to break it all down:

If you read everything down to this point, you already know I ran into a number of issues.  The data features of the Iridium GO! haven't worked for me as of yet.  Supposedly Iridium is working on an app update that will be released in October that may address these issues.  Until then, I'll keep going around with customer support to see what they can do.

I have read of other users having success - so it could be a phone or operating system specific issue that I am butting heads with.  I also haven't discounted the possibility that my provider screwed up something.  I'll update this if/when I find out more, or have better success.

With all that said, at this point I cannot recommend the Iridium GO! if you need it solely for data connection purposes - i.e., checking your email and some limited website browsing. - as I have yet to see either working first hand.  I would wait and see how the technology develops.

If you want the ability to make calls from anywhere, or receive an SMS message from anyone, the Iridium GO! can do that.  This enables you, at worst, to forward your email (as I did) to your GO! (limited to the first 140 characters).

This is something the Delorme Inreach cannot do.  The only way to get a message to an Inreach is to use the webpage portal, or message someone from your Inreach first, so that they can reply directly from their phone/device/email.

If you don't need that particular ability, I would recommend just getting an InReach.  You can see my review of that device here.  Not only is it cheaper to purchase, and cheaper to operate (by far!) than the Iridium GO! - in my testing it also worked much more reliably for SMS messaging.

It's also almost half the weight, has better battery life, and includes navigation abilities - if any of that is important to you.

Assuming you have someone minding the office to act as a go-between, you can still correspond with whomever you need, albeit with a little more work (and some extra back-and-forth).

I expect the functionality of the GO! to improve.  It's still a relatively new device and network, and no doubt the engineers are working hard to solidify the service.  If/when that days comes, I'll be happy to update this review.

I'd also be curious to hear other user's experiences, feel free to drop a line below if you have an Iridium GO!.

Saturday, August 20, 2016

Delorme Inreach Explorer

I've had the Delorme InReach Explorer for quite a while now, so here is a quick review along with some info on using the device.  I'll also include details on what the InReach can and can't do.  When I was researching these devices, accurate information on their capabilities was surprisingly hard to find.  The InReach is also available in the slightly cheaper SE version - I'll highlight those differences here as well.


It also makes sense to draw comparison with the other big name is adventure SOS beacons, the SPOT.  I've had a the Gen 2 Spot beacon for a few years, but it's been completely supplanted by the Delorme.  There are a couple of reasons for that:

  • I've had a few instances where my Spot couldn't lock onto satellites, despite a flawless sky overhead.
  • On several occasions, despite having a satellite lock, I couldn't get a confirmation that my message was sent.
  • Occasional when a message IS sent and received, my coordinates weren't attached.

That last one is a bit of an issue, if you actually need to press that SOS button (which I never have).  For my purpose, it's more of an annoyance than a real worry.  My primary use for the Spot is it's 3 pre-arranged messages as a way to let folks at home know I'm ok and on plan.

Despite those niggles above, my Gen 2 SPOT has worked and done the job.  Also, while I don't own the upgraded Gen 3, I've seen them in action and they appear to work flawlessly.


My reason's for upgrading to the Delorme InReach

  • The InReach is a 2-way messenger, the SPOT is strictly a transmit-only device.
  • With the InReach, you get a real confirmation that a message was transmitted, so you aren't left wondering.
  • You can receive texts and "emails" (more on this later) from anyone you want.  People at home can reach out to you in case of emergencies.
  • Along with the 3 free preset messages (similar to the 3 you could have with the spot), you can also program any number of quick messages, or simply type a custom message.
  • You can pair the Delorme with a smartphone via Bluetooth to enable more features, including easier message entry, and access to your contact lists.
  • Rechargeable - this is more of a plus minus perhaps.  The spot uses 3 AAA batteries so you can swap them out anytime (and make handy backups for your headlamp).  The Delorme uses a non-swapable rechargeable battery (via micro usb port) so you can juice it up with a battery back or solar charger.


The Delorme Inreach Service

The Delorme InReach uses the Iridium Sattelite Network.  Before using it, you'll need to sign up for a service plan.  More akin to a cell phone subscription then the SPOT's once a year fee.  There are four plans available, with the differences being how many "free" text messages (sent or received) you get, and then the per-message fee.  You can see the details of these plans here.

Note - you can suspend your service at any time, so no need to pay for it if you won't be on the trail for most of the year.  This is an awesome feature, and makes the service as a whole very economical.

I use el-cheapo "Safety" plan.  10 messages a month ($.50 for each additional), 10 tracking points a month (more on that later), with additional points being .10 each.  All for about $15/mo.  It's proving more than adequate for my purposes, being just occasional check-ins from the trail.  In practice I find I'm spending less money for my Delorme service than the $100 annual SPOT service.  Financially, the only downside to upgrading to the SPOT is the higher upfront purchase price.


Using the InReach

On the trail messaging:

Presets

I use the "Preset" messages (which are totally free, regardless of how many you send) for what I used to use the SPOT for.  Quick notes to tell people I'm starting my trip, an OK/checkin, or arrival at camp.

On your Delorme account page (where you also configure the messages) you can preset who the messages go to.  Recipients can be any email address, SMS phone number, or even Facebook (which you need to configure under the "Social" tab).

All messages include location info, as well as a link to
https://explore.delorme.com/Map
where people can view your recent activity and previous messages.

You can restrict or allow who can see what from the "Social" tab well.


Custom Messages

If you want to send more complex messages (that count against your monthly allotment), you have two flavors, "Quick", and custom.

Quick messages are setup under the "Messages" tab here: https://explore.delorme.com/Messages.  You can have any number of these configured.  They are essentially just ways to save time when drafting a message in the field.

Which ever type of message you want to send, just hit the "Messages" Icon on your Delorme.  This takes you to your inbox.  Hit "New Message" at the top.  On the next screen, you enter your recipients one of two ways.  Hunt and peck the onscreen keyboard with the cursor, or hit the "Select" button where you can choose from your list of preset contacts.


Next step, you enter your message itself.  Again, you can use the hunt-and-peck method (pretty time consuming as you have to use the arrow keys to move the cursor then hit the check button to select), or hit "Select" which will bring up all those "Quick" messages you prearranged on the Delorme web portal.

Note - your outgoing message only counts as one message, regardless of the number of recipients - however each individual incoming message WILL count.  It's best to tell people to not run wild!

For easier messaging, pair your smartphone via bluetooth.  Then download the Earthmate App from your devices appstore.

You'll have access to all the types of messaging, as well as your phones contact list, and of course your phones standard keyboard.  This is much more satisfying for complex communication.


I want to drop a quick note here about connecting your Delorme to your phone, as it might be a little confusing.  After you download the Earthmate app, turn on bluetooth on your phone and enter pairing mode.  On your Delorme, go to Settings -> Bluetooth.  Make sure "Enabled" is on, then hit "Pair Inreach".  Follow the usually procedure on your phone to complete the pairing.

Once pairing is complete, the Delorme won't show as connected - don't try, it doesn't work.  Instead just fire up the Earthmate app.  Now your phone will connect to the InReach automatically.  This is nice as it reduces the power draw if you forget to turn off bluetooth on either device, the connection won't be active without the app running.


Receiving Messages

There are a few ways for people to send you messages, but it's not quite as clearcut as it might seem initially.

The first option is texting.  Anyone can send you a standard SMS text message, provided that you message them first.  The phone number that appears in the text message rotates, so there is no guarantee you will receive the text if someone sends it to that number again sometime in the future.  To make sure it gets through, they need to reply to a message received from you and your InReach.

The next option is using the Delorme MapShare portal.  If you have enabled it, anyone who views your map page (which be be password protected if you choose) can use the form there to send you an email.  You can find your MapShare address under the "Social" tab.  Note - this is the only option that allows you to receive a message without first initiating a conversation.

The final option, which works even if you haven't enabled open access to your map page, requires you send users an email from your InReach.  Included in that message will be a link to your MapShare page that includes the send message form.  Recipients must use that form to reply.

***Just to reiterate - you cannot send an email directly to an InReach.  No way no how.  This can be misleading as on your account page will be listed an address [your username]@inreach.delorme.com.  Sending an email to this just results in a bounce back.  For a time, there was a way to accomplish sending an email via script, but Delorme has since blocked that ability.  Unless they choose to change it, there just isn't a way.


InReach to InReach Communication

That address@inreach.delorme.com is used for InReach to InReach communication.  It's helpful to preconfigure it in your Delorme contact list (there is a specific field for it when creating a contact).  Afterwards you can easily send your adventure companions a direct message in the field.


Other Messaging Options


Facebook:

You can post to Facebook directly from your device as well, using the "Social" icon.  Again, you'll need to have this preconfigured at https://explore.delorme.com/Social.

SOS:

To turn on panic mode, which will automatically notify search and rescue to come for you, there are two options.

Either hit the "SOS" icon onscreen, then hit the 'Emergency' button onscreen (the SOS will be cancelled after 5 seconds if you do not hit Emergency button). OR,

Slide the safety button on the bottom middle of the Delorme LEFT, then press the SOS button in the bottom right.

Keep in mind, depending on where you are, search and rescue extraction can be VERY expensive.   You can purchase insurance in various locals for very little.  Delorme also offers extensive coverage on their site which can be included in your InReach subscription.

With all messaging options, the message indicator will change when the message is transmitted, and when it is received by the Iridium Network.  This is a fantastic feature as compared to how the SPOT operates - where you can usually tell a message has been sent from your beacon, but you have no way to know that it made it to the outside world.  With the InReach you not only get that confirmation, your recipients can actually reply to you - possibly a critical feature in a true emergency.


Navigation

The difference between the InReach Explorer and the InReach SE are "Navigation" features.  However, with BOTH models, you have access to the Delorme Earthmate smartphone app.  It includes topo maps (which you can pre-download for use in the field) and the ability to setup and navigate routes, create waypoints etc.


This makes the extra ~$100 bucks you have to fork out for the Explorer maybe a toss up for most.  What you get for your money is the ability to view and follow routes on the InReach Explorer itself without having to use the app.  Which is handy, but probably not critical for most people.  I've actually only used this feature a handful of times myself - though it is nice to not need a separate dedicated GPS for basic navigation.

With that said, you also aren't going to have all the abilities of a full-featured GPS unit.  First and foremost, you won't have a topo map on your InReach.  What you will get is a white grid with your route displayed.  It's not fantastic, but enough to make sure you are on-route.  It's never going to replace carrying a paper map (which you should always have anyway, really).

If you want to record a detailed track, this also isn't going to do the job.  Part of the reason is battery drain - the main purpose of the InReach is communication, afterall.  You can create waypoints as part of the navigation features, but not record a track, per se.

What you can do (with both the Explorer and SE models) is utilize tracking points - which can be stored on your device or transmitted out to the world, and displayed on your InReach map portal (viewable by all if you've enabled it).  You get some points for free (based on your subscription package) after that, it's gonna cost.

You can set the interval under Settings -> Tracking.  A tighter interval of course is more accurate, but costs more money and drains more battery.  You also have more limited storage that you will on your average GPS.

Fore me, the InReach Explorer has just enough navigation features that I leave my Garmin Oregon 650t at home most of the time.  The InReach is dual purpose, and is lighter than the Oregon.  Though using the navigation features are admittedly frustrating and cumbersome compared to my beloved Garmin.  Though if I am really in a bind, I'll just fire up my smart phone to utilize Earthmate or any number of other map apps.


Conclusion

For me, the InReach is an incredible device.  It gives you the ability to check in with home, which becomes a game changer for some of us seeking to get out on adventures but needing to stay in touch.  All parties involved can have some peace of mind.  You can also get weather reports, which can sometimes be crucial to your daily plans.  In this day in age, there really isn't a reason to have some sort of emergency beacon - even if it isn't one that requires a subscription service to function.  If you are a trip leader or just go out frequently - get one.

The cost breakdown between the InReach Explorer, InReach SE, and the SPOT Gen 3:


In my opinion, the extra $100 of the InReach SE vs. a SPOT Gen 3 is a no-brainer.  You get so many more features, it's an incredible value.  Additionally, if you only need to have your Delorme activated a few months out of the year, your subscriptions costs will be much less than with the SPOT, which starts at $99 a year.

Picking the Explorer over the SE is a personal choice, and more or less comes down if you think being able to view and navigate a route on the device without having to use your smartphone is worth an extra hundred bucks or so.

Anything you'd like to know about the InReach Explorer that I missed?  Feel free to drop a message below.

*Delorme has been purchased by Garmin.  While no service changes are expected in the near term, that is always a possiblity.  Most likely Delorme devices and services won't change, but Delorme features will be integrated into Garmin products.


Wednesday, February 10, 2016

Hammocking 101

As someone who has been hammocking almost exclusively on all my backpacking trips for a number of years, I often get asked "What do I need to do to start Hammocking?" I hang in all 4 seasons, so I guess I've become something of an authority on the subject.  At least among DCUL anyway ;)


There is of course a great book out there that can give you a jump start, The Ultimate Hang.  I actually didn't come across it until well after I had already traversed the painful hammock learning curve.  I could have avoided some VERY cold nights!  But trial and error is just my style.

Feel free to use the following advice in lieu of (or in addition too!) Derek's book.  I'll also sprinkle this primer with the gear and hardware I've used throughout my hammocking career.


Why Hammock?

For those who might be reading this and don't know what all the fuss is about, I should probably start with the obvious question: "Why hammock at all?  What's wrong with my ground system?"

Well, probably not a thing!  It's a personal preference, but there are some advantages to hangin'.

For me, most importantly, I hammock to get a good nights sleep outdoors.  Try as I might, I just don't sleep well on the ground.  I'm a side sleeper mainly, with broad shoulders.  No matter how luxurious a sleeping pad I employ, I rotisserie all night and still wake up with acking back, shoulders, and hips.  All those issues became a thing of the past when I become a "hanger".

Another advantage, which was highlighted on the very first trip I tried hammocking, is staying "high n' dry".  If you've done it correctly, the only bit of your sleep and shelter system that will get wet during a downpour is your tarp.  Even if you setup after (or during!) a storm.  You can blissfully pack up your gear and keep it dry under the safety of your shelter while your camp mates are wallowing in the mud!

So what are the disadvantages?

Compared to a ground system, I would say that a complete hammock system is going to be (potentially) slightly more expensive, and also slightly heavier.  Depending on the setup, my hammock system weighs in between 8 and 16 ounces heavier than my comparable ground system.  In the summer however, my hammock setup can actually be lighter than my ground setup!

There is also the previously mentioned steep learning curve.  Hammocking is inherently more complex.  You have more moving parts and pieces.  I think I can generally have my hammock setup just as fast as most people put together their ground system - but I've had some long setup times due to exhaustion or frozen fingers.  Or sometimes the trees don't cooperate and you just can't find a good spot for a perfect "hang".  In addition, a failure of your suspension or hammock itself my lead to spending an uncomfortable night on the ground.

For me, the slight disadvantages are more than blown away by all the advantages.  I probably would have stopped backpacking long ago if I had stayed with ground sleeping.  So far, I haven't experienced a critical failure of my system - but I have seen it happen to others.


The Anatomy of The Hang

A hammock system essentially has the same pieces as a ground system, with the hammock itself thrown in.  You have your shelter, your top insulation, and your bottom insulation.  We'll start with that tricky bottom insulation first.

Underquilts!

The first time I hammocked overnight was actually in The Black Hills of South Dakota in the summer with a cheapo Byer Traveller Lite Hammock.  It seemed like a perfect fit!  Mild weather, lots of trees, what could possibly go wrong?

Well it wasn't bad, but I was definitely cold.  I'm sure the temperature never got below 50, but with no underquilt or pad, the mild summer night and light wind most certainly chilled me.  Yeah, classic noob hammocker mistake.  You gotta have bottom insulation.  Almost all of us have a similar story.

The next few trips after that I used my foam Z-lite sleeping pad.  This was way warmer, but still not ideal.  My shoulders always got cold (being pressed up against the hammock), and I found myself slipping around all night.  Staying on the pad was a challenge.

Then, at long last, I discovered the miraculous invention that is the Underquilt.  Hammocking has been bliss ever since.  No more Cold-Butt-Syndrome.  No more chilly, sleepless nights!


Underquilts have a comfort rating just like sleeping bags (and top quilts) to help you choose the one you need.

I've purchased several from Hammock Gear over the years.  Their prices are good, quality top-notch, and comfort ratings are quite generous.  You can get your quilt custom made exactly the way you want it.

Bottom line - never go hammocking without bottom insulation, any more than you would sleep right on the ground.  No, not even in the summer!  Even on hot Virginia nights, I might leave my top quilt at home, but you bet your butt I'll have an underquilt.  I also can't really recommend using a pad in a hammock.  Yes, it works.  And plenty of people are completely happy with it.  But in my humble opinion the underquilt is the only game in town.

Top Quilts/Sleeping Bags

This part is easy.  Chances are, you already have a sleeping bag or two.  It works just fine for hammocking!  I used several more or less in "quilt mode" (i.e. unzipped and just on top of me) when I first started hanging.  Eventually I starting acquiring topquilts (also from Hammock Gear) to save some weight and shed some excess bulk.  You might find in the mild summer months that a bag liner is all you need also.  So top insulation, check!

Shelter

There are a variety of tarps you can use for keeping out of the wind and rain.  From a plain old nylon square tarp to one purpose built for hammocks.  I started off with an ENO ProFly - cheap, durable, and easy to setup.  Eventually I wanted less weight, and more coverage.  Enter Cuben Fiber!  I purchased a cuben tarp with doors from Hammock Gear - and it's been all I've used since.  6.4 ounces!


I eventually rigged the tie-outs with 1/8" shock cord and Nite Ize Figure 9s (after trying various other methods).  This makes for a rapid and easy-to-adjust setup.  It also takes up any slack that might develop in your tarp due to rain, snow, or any minor adjustments you make.  Combined with some fancy titanium gear from www.dutchware.com I had a lighting fast setup with minimal weight.


If you are already familiar with ground tarps for shelters - or you like cowboy camping - transitioning to sleeping under a hammock tarp is pretty easy.  If you are used to more traditional tents or other fully enclosed shelters, you mind find it a little disconcerting at first.  But give it some time - you might find you love the open feeling!  Especially once you enjoy the other benefits, such as total lack of condensation.  It's hard to beat getting gently rocked to sleep under a canopy of stars.

The Hammock

So which hammock to pick?  There are probably hundreds if not thousands of hammock manufacturers out there.  There are also multiple types.  The kind I'll be talking about are gathered end hammocks.  As opposed to another common type, a bridge hammock.  Gathered end hammocks work by creating a nice "sag" in the middle.  You get in, and then sleep diagonally - this keeps your back and legs straight.  A bridge hammock is meant to be suspended tightly, and uses rods or poles at the end to keep everything taut.

Gathered end hammocks are not only lighter and cheaper, I think they are more comfortable.  They are also a cinch to setup.


Like I mentioned above, I used a dirt cheap Byer Traveller Lite Hammock for years before deciding to upgrade.  I wanted an even bigger (and lighter) hammock for my 6'5" frame, so I checked out Butt In A Sling.  Their "Weight Weenie Micro" checked both those boxes.  It also has a built in Amsteel ridgeline - something I hadn't tried before but consider a must have feature now.  It not only gives you a consistent sag, it gives you a place to hang your stuff at night!


More recently I discovered Sheltowee Hammocks.  They make a variety of gathered-end hammocks, but I was most interested in their Boone Hammocks.  These have built in underquilts, yet are still adjustable.  What you get is a full coverage underquilt that is faster to deploy and much warmer then your average hammock + underquilt setup.  The only sacrifice is a slightly heavier weight.  Also, you can't remove the underquilt if you want to head into colder temps then normal - though you can add to it!

If you have more than one underquilt, you can double them up for bonus warmth.  Just remember that to be fully effective, the insulation needs to loft fully.  So don't string it up too tightly.  You can double up your top-insulation in the same way!


Putting It All Together

So how do you actually get all this nonsense setup?  Well, there are any number of ways - each depending on the the gear you have selected.  In addition, the order I put things up varies depending on the situation.

For example, if weather is crappy, I'm obviously going to put up my tarp first so I can hang my hammock in a dry space.  Otherwise, I'll generally hang my hammock first.  If it's windy and cold, I'll string my tarp low and tight around my hammock.  If it's hot, or just nice out and I want to have my tarp open I'll rig it up high (or not put it up at all!).

Here is an overview video I did a while back (featuring the Boone 40 hammock from Sheltowee Hammock Company).  It should give you a general idea if you've never seen a hammock system in person.  Then we'll break it down:


In the video, I am using Stingerz from Dutchware to string up my tarp.  If you look at the bottom of his page, you'll see a close up video of how to use his Stingerz.  


Now, all this fancy hardware does is allow for a fast and easy setup.  It's also more convenient when you have frozen fingers.  However, you can easily accomplish the same thing with any old cord and some knots if you have the inclination.  Some tarps, like the ENO ProFly have built in cord and line-locks which are pretty easy.  I use a combo of knots and hardware.

A continuous tarp ridgeline is another method of hanging your tarp.  It allows you to easily move and center your tarp at will.  Two methods to do this can be found here on Dutch's site.  

Another continuous ridgeline method is to just attach your ridgeline cord to one end of your tarp with a small biner, go around one of the trees then back to the biner (forming a V shape with the tree), then continue to the other end of your tarp.  Clip the ridgeline into a biner there, then continue around the other tree, form another V, then back to the last biner where you tie it off.  You can use a Stingerz to make that tie off easy on one end.  With this setup, you can slide the entire tarp back and forth easily to center it.

The method I use most often is to simply attach the tarp to the hammock suspension itself using amsteel prussik knots.  Obviously this requires hanging the hammock first, but it's the fastest and easiest method of all.  For the tarp to stay taut however, you need to nail that 30 degree angle.  And you need to use shock cords on your tarp tie-outs.  With care, you can even take down your hammock first in the morning if it happens to start raining.  (Assuming the prussik is on your tree strap and not your whoopie sling).


However you hang the tarp, you will generally need 4 stakes to then tie out the bottom corners.  Some tarps have doors as well (flaps really) that you will need to secure with more stakes (or just tie them back to the tarp if you want airflow).  I use the classic UL staple: the titanium hook stake.

201 level tip - I rarely end up using all my stakes.  The tie out setup utilizing the Figure 9's allows you to easily loop around conveniently located trees, brush, logs, rocks, etc.

Hanging the hammock itself is probably the part that takes the longest to master.  Derek (from the Ultimate Hang) probably describes it best, but here is the gist of it:


1) Find two trees at least between 12' and 20' apart (or whatever you determine your rigs min and max distance to be - your height is a factor!).  You can gauge this in the wild by pacing it off.  The average span of a normal walking step is roughly 3 feet.

2) Based on the trees separation, put your tree slings/huggers/traps around both trees.  For example, for me and my setup, I know for trees that are 12 feet apart I need my straps to be at chin height.  For trees that are 18' apart I need to be about 2 feet above my head.

3) Attach one end of the hammock to one strap, un-roll/bag/bunch your hammock, and attach the other end to the other tree.  Verify you have roughly a 30 degree angle between your hammock suspension line and the tree using the "thumb and forefinger" method:  If you stand next to the tree, and put your hand out with your palm facing you, just stick your thumb straight up and your forefinger straight out - that angle between the tip of your thumb and finger is just about exactly 30 degrees.  Adjust the height of your tree straps and the length of your suspension to the hammock to match.

4) Attach your underquilt to the hammock.

5) Throw your topquilt into the hammock.

6) Get in (slowly!) to make sure your attachments are all good.  Sleep!

Optionally, you may like a pillow.  Sometimes I use one, sometimes not.  My neck has funky issues so sometimes I need the extra support.

Hammock hanging nitty gritty:  I prefer to use tree straps (just simple climbing webbing that is about 5 to 6 feet in length) + whoopie slings (if you are the DIY sort, they are actually quite easy to make.  Get some Amsteel and fire up Youtube).

One end of my tree straps have a Dutchware strap hook on the end.  I wrap the strap around the tree, and hook it, leaving the excess hanging down.  Then I take the eyelet from my whoopie sling (which is attached directly to my hammock) and tie it to my strap with a Becket Hitch (modified with a slip knot for easy removal).

This is the lightest suspension method I have found that also allows for easy adjustment.  It's also very fast to put up and take down.  However, you can use just about anything you want that will take the weight.  I even tried paracord once.  FYI - it's terrible, stretches too much and binds too easily.  You can also just have your tree straps continue all the way from the tree to your hammock for a dirt simple approach (most off the shelf hammock systems work this way).  Play around with different methods, putting it together and taking it down, until you find the method you prefer.

I would recommend NOT just heading out into the wild and figuring it all out the first time you decide to overnight in a hammock.  Sure, you can probably make it work, but fumbling around and/or finding out you are missing something would be annoying.

If you are going into bug season, consider adding a bug net like the Buginator from BIAS.  Some hammocks have a built in bug net as well.  Or simple wear a headnet if most of your body will be covered up anyway.  You might get some ants crawling on you if your tree selection is unlucky.

Other additional gear to consider: Weathershields.  I've experimented with these some, but find I rarely need them.  Essentially they are an additional barrier that goes outside of your underquilt to stop wind and moisture.  This can be a big help when dealing with crosswinds.  Keep in mind though if you use a totally waterproof fabric, you will get condensation buildup on the underside of your underquilt from your bodies perspiration.

A recent item from Thermorest could be the holy-grail of barriers however: The Slacker Hammock Warmer.  I just received my yesterday, expect a review soon!


I hope this rapid fire primer gives you some ideas to try out and saves you some aggravation!  When learning to hammock, experimentation is the name of the game.  You will learn something new the first dozen times you go for an overnight hang.

Have some questions?  Need more details or more info?  Let me know!  I'm happy to expand on this.  Undoubtedly there are things I've forgotten to mention, and I don't want you to be stuck as a ground dweller due to lack of information!

Happy Hangin'!


Gear Links

Hammocks:
BIAS Weight Weenie Micro: http://www.buttinasling.com/wewemi.html
Byer Traveller Lite: http://amzn.to/1XjvWfe

Tarps:

Hardware:
Nite Ize Figure 9's (mini): http://amzn.to/1K1uX1b

Quilts:
Top and bottom quilts from HG: http://www.hammockgear.com/down-quilts/

Other stuff:
Hammock Warmer: http://amzn.to/1ot0249
Climbing webbing: http://amzn.to/1ot0Cif


Thursday, October 29, 2015

Gaiters!

They come in many shapes and sizes, and like most of my other gear, I've tried a lot of different onces!

Not every hiker uses, or even likes gaiters.  But I've always found them helpful.  They keep debris out of your trail runners, snow and rain out of your boots, and maybe the bottom of your pants dry while making post-holes.  I've also avoided losing a shoe to the suction power of a muddy trail thanks to these little gems.

So here is a list of the the various brand and types I've tried over the past few years.  Mostly, I use low gaiters.  I've never really felt a tremendous need for high gaiters, though I have worn them in the summer (in combination with running shorts) if I'm tearing through thorns and brambles.


Outdoor Research Rocky Mountain Low Gaiters


This was the first pair of gaiters I ever bought, and they are still in great shape!  I haven't even worn through the bottom strap - which is usually the first thing to go.  I use these for winter and snowy hikes when I switch to boots, as they have a bit more room and fit better than my other smaller gaiters.

They stay put very well, and do a good job of keeping debris and snow out of your boots.  Sometimes I get annoyed with the extra velcro locking tabs at the top - but they always stay closed, so it's worth it.

You can get them on Amazon for $32.50 as of today.  In my opinion, that's a good deal considering how long mine have lasted.


REI Low Gaiters

I have a slightly older version, but they are essentially the same.  I don't use them much anymore, as I've found other brands that are more versatile or easier to use.  But they do a good job, and are a good option if you have never tried gaiters before.  You can pick them up at REI and return them easily if it doesn't work out.  The other pairs below are all from online-only cottage industry shops - so returns aren't as easy.

I tore through the thin retention string in no time on these, and since replaced them with 1/8" shock cord (you can get it in bulk here).  This isn't a problem with hiking boots, as they have a higher arch, which generally keeps the cord from contacted rocks and such.  But with trail runners, it's going to cut through sooner or later, even if your soles have a notch specifically for gaiter cords.  So, that's a slight hassle when it breaks and you have to splice the cord together or replace it with a spare.  These are $29.50 at REI.


Simblissity LevaGaiter


These gaiters are ultralight, at only 1.8 ounces per pair, and intended with use with trail-runners.  So they are perfect for moving fast.  They are stretchy, durable, and comfortable.  Keeping out rocks and shedding water well.  They close in the front using velcro, which also conceals the adjustable toe hook.

They are touted as being able to stay put without the need for velcro at the heel or an undershoe cord - though I never had any such luck.  I ended up having to put a cord on them despite trying every conceivable adjustment and configuration.  I have big feet (size 14), so I can concede that I might be outside of their ideal size range (story of my life).  They have worked well for others, and are recommended by Andrew Skurka.  You can get them here, for $27.95.


Equinox Trail Gaiter

My one and only pair of calf-high gaiters.  I got them as thorn defense after a serious of bloody hikes through brambles.  I like that they zip up in the back, so the zipper doesn't rub on your shin (I usually wear shorts with these).  The stay put well, but have the same cord issues as other gaiters if you use them with train-runners.  They are easily roomy enough for boots though.  I might take them out for winter this year - we'll see!

My only gripe: I wish the top draw cord had more adjustment.  Since I almost always hike in shorts (almost certainly not the way these are intended to be used) they often fall down.

These are a great deal for the price, you can get them here for $24.95-26.95.


Dirty Girl Gaiters


These have easily become my favorite.  Besides having a fun name that is sure to make your postman raise an eyebrow, they are the most simple of all the gaiters reviewed here.  And they stay put without an undershoe cord!

You put on these like a sock, before putting on your shoe, as they are a continuous piece of fabric without a front or rear seam.  This works very well and makes them faster to put on then any of my other gaiters.  They have a front toe hook, and velcro sewn into the heel.  You'll get a long strip of matching velcro to attach to your shoes.  Surprisingly, it sticks very well, even after getting wet and grimy.

They meet all the needs of keeping junk out of your shoe, and shedding water very well.  Like the LevaGaiters, this are meant for trail-runners, though you could probably stretch them over smaller hiking boots if you really wanted to.

Dirty Girls gaiters are my go to for 3 season hiking and trail running, I only wish I had tried them sooner!  They have countless patterns and colors available, and at $21 a pair, are a steal.  Go get yours here.


Saturday, October 24, 2015

Peak Designs Capture Clip

The Peak Designs Capture Clip


This is one of the gadgets that come's along and you immediately exclaim "Where have you been all my life!?"  Well, you might if you are into photography and hiking anyway.  Of all my gear, this is the one item I probably get asked about the most while roaming the trails.

Simply put, the Capture Clip is two parts: a plate that screws to the bottom of your camera, and a clip that fastens to your pack's shoulder strap (or your belt, camera bag strap, etc.).  Then you can clip on camera, and hit the trail.  When it's time to snap a shot, you just push a red button, and lift your camera.  You are ready to shoot!

It's easy and fluid - no more dropping your pack to dig out your DSLR.  No fumbling with camera straps.  It's super secure, and won't move around even if you are blazing along, and easily handles even a full frame camera with a heavy lens.

You can get clips to match smaller point and shoots cameras as well, or even GoPro's.  It make shooting point of view video easy, and it's a great alternative to a chest harness.

They also make a "Pro" version where the clip can double as a tripod mount, saving you a few ounces on your backcountry camera kit.

Peak Designs actually began as a kick starter, and since then they have refined the system and starting making more accessories.  There are some cheaper knock-offs out there already, but personally I'm a little wary of trusting my expensive camera (and lenses) to something that I don't know is rock solid or not.


It's only up for pre-order now, but they have debuted a Lens Capture Clip.  I usually carry around 2 lenses, either in my Zpacks should strap bottle holder or in a hip pocket.  Neither is fluid when I want to change lenses.  So I can see myself adding this to my gear in the future.


The Capture Clip has become a staple amongst us photo-bugs in DCUL.  Being able to hike with our cameras and have them ready to go means we've gotten a lot of shots that otherwise might have been missed.

You can get one at Amazon, or just head over to peakdesigns.com.


Zpacks Arc Blast

I think I've gotten enough miles on this pack to write up a worthy review.  I'll start off by saying I absolutely love this thing!  I ordered an Arc Blast from Zpacks.com when I got tired of carrying several days worth of food in my frameless MLD Burn.  While I really like the Burn, I missed the support of a frame for heavier loads (more than 20 lbs).  I didn't want to revert back to the relatively "heavy" Osprey Exos 46 however.  There is a newer version, the Exos 48 which is weighs in at 2.6 lbs - excellent for a mainstream company.  Still, I didn't want to buy another (nearly identical) pack to save just a couple of ounces.

On the Hammersley Wild hike, Chris carried a Zpacks backpack - and after the Sufferfest I decided to check them out.  The price is steep, but all high end ultralight gear is.  And the base weight is only 16.5 ounces (52 liter version)!!!

Matt was extremely helpful and responsive when placing my order.  You gotta love the ultralight cottage industry community - where else can you communicate directly with the people making your gear?  Despite being in the middle of their heavy order season, they got it out to me in just a couple of weeks.  Finally, a pack customized to fit my 6' 5" torso!  You can't get that with an Osprey back.


Arc Blast details from Zpacks.com:

45L Pack Size:
Total Volume: 45 Liters / 2,750 cubic inches - 16.0 ounces (454 grams), $275
Body dimensions: 5.5" x 12.5" x 30"  (14 cm x 31.8 cm x 76 cm)

52L Pack Size (the original default size):
Total Volume: 52 Liters / 3,200 cubic inches - 16.5 ounces (468 grams), $279
Body dimensions: 6.5" x 12.5" x 30"  (16.5 cm x 31.8 cm x 76 cm)

60L Pack Size:
Total Volume: 60 Liters / 3,650 cubic inches - 17.0 ounces (482 grams), $289
Body dimensions: 7.5" x 12.5" x 30"  (19 cm x 31.8 cm x 76 cm)

Pockets:
The side pockets account for 5 Liters / 300 cubic inches and the mesh center pocket is 8 Liters / 500 cubic inches, and are included in the total volume.

I purchased the 52 liter.  Coincidentally, frequent hiking buddy GQ also got the Arc Blast about a week before me!  I also chose to add on the hip pockets (removable), bottle holder (attaches to chest strap, also removable), ice tool holders, and trekking pole holders.  The total weight, with my additions, came to 19 ounces.

This is the lightest back with a frame I have every seen.  This feat is accomplished by building the pack out of light weight denier reinforced cuben fiber, using carbon fiber for the frame, and leaving off the countless unnecessary buckles, straps, and extras found on mainstream packs.

You can choose your torso length (huge selling factor for me), belt length, and color (they have several options, including camo!).  You can also choose to leave off some options, like the frame or hydration port if you don't want them.  All this can be customized right on the site, which is very cool and easy.  Definitely go check out the site - they have tons of pics of all the different configurations.


The packs stand up pretty well, unlike frameless packs.
Toughness

Early versions of Zpacks were pure Cuben Fiber - but the new Arc Blast is a hybrid Cuben plus denier polyester protective coating.  I was nervous at first about the durability - but so far that feeling has proven unfounded.  The only hole in mine came from getting my bottle holder snagged on a branch while navigating tight summit trails in the ADK's.  Nothing a small square of Gorilla Tape couldn't fix.


GQ reported that he started to see some wear on the very bottom of his pack from sliding down rock scrambles (LOTS of them), presumably.  He preemptively applied some tape and all was well.  I haven't noticed this problem with mine, but intend to keep an eye on it.

I put it through any number of stress tests over the last year or so I've had it, including a couple of packraft trips.

I was worried that I'd find some wear marks from the paddle edges, or that the hard jostling run might pull some shoulder strap threads.  My fears were completely unwarranted, as it come through unscathed.


Features and Accesories

It's rainproof!  I'd almost go so far as to say, if you sealed up the hydration port, you could fully submerge it and come through with dry gear.  I haven't tried that yet - but I have experienced a full-on deluge that took me from sweltering to near-hypothermic in minutes.  This was after 12 hours of my sweaty back contacting the bottom of my pack where my quilt was.  One or the other (or the combination) managed to get the barest amount of moisture on the surface of the quilt.  But I mean really minor.  And only at the very bottom of the pack, maybe 10 square inches.

I didn't have it in a dry bag like I usually do (generally a bad idea, but I wanted to see what would happen).  Knowing the shear volume of water that was dumped on me, I call this an incredible achievement in water-proofness.  If you use a light dry bag like Sea to Summit's Ultra-Sil Nano inside your bag, or garbage bag liner (as you really should for any trip to be sure your down-goodness stays dry) - you will be good to go.

Quick aside - I actually stopped using garbage compactor bags a year or so ago.  I had a hard time finding them cheap, and was constantly tearing them.  The Ultra-Sil bags are of comparable weight, but you have a secure closure in case your bag actually is submerged.  It's nice to guarantee dry gear.  Just my 2 cents.

GQ did a shower test - putting the pack in the shower for 30 minutes.  The insides came through dry.

The top has a dry bag-like roll up and buckle snap closure.  The top seam also has velcro, making it easy to align the edges when rolling them down, giving you a nice solid rain proof seal.  It works very well.  It also lets you tighten down the pack to fit small loads.


The optional hip pockets are also rain-proof.  I have the older style, that close with a flap and velcro.  The newer versions are your standard taped zipper style.  Both are quite generous in size.


The back rest is a suspending mesh panel.  You can adjust the arc by tightening or loosening a pair of line-locks at the top by your shoulders.  Mine seem to always work there way loose eventually.


On the sides you have some reflective line for securing stuff above or in our bottle holders.  The bottle holders on each side (with you can optionally leave off) are quite ample - holding a 32 or 40 bottle.  The tops have shock cord woven in to give you some retention.  It's not quite as secure as some other packs I've had, yet I've only tossed my bottles a couple of times (during nasty ski spills!).    They stay put just find on scrambles and ballistic movements.


You will find a long list of accessories and mods are Zpack's site - so I won't bother to list them here.  But it's nice that they easily give you the option to customize your pack exactly to your needs and wants.


Conclusions

With many, many miles on it already, I'm confident this pack will last a very long time.  My only regret is not getting the 60 liter version for winter expeditions.  But really, I might only have trip or two a year that need that kind of capacity.  The rest of the year I'll barely fill three quarters of the pack.

While pricey, the Arc Blast is more than worth it to have a pack that fits me like a glove.  The incredible base weight and other features are a bonus.  Zpacks customer service is great, and very responsive.  I have no reservations about recommending them or their gear.


A long with my Arc Blast, I ordered a set of Zpack's rain gear.  Rain jacket, kilt, and mitts - all in Cuben.  The kilt has gotten the most use, it's perfect for 3-season rain showers!

One method for dealing with oppressive heat during a rainstorm!